Saturday, April 30, 2011

Love Me Some Lotta Labels

Remember when I went to Lotta Jansdotter's studio in Brooklyn last year? Well, while I was there I picked these little guys up. And I'm so glad I did! (p.s. I didn't realize these photos were quite this blurry on my iPhone - sorry!)


I use them to spruce up the simplest of packages. My favorite is brown postal wrap with baker's twine. And I use the large Avery Manila Shipping Tags (for everything, basically) and adhere the Lotta stickers. Often times, in lieu of a card, I write my message on the back.

Wedding shower:


Baby gift:


Birthday gift:

Thursday, April 21, 2011

Mini-Spree


I have been fairly disciplined about refraining from unnecessary fabric purchases lately, but I had a little weak moment the other day on Pink Chalk Fabrics. I do have a project in mind, so it's totally justified :)

I love.

Tuesday, April 19, 2011

Easter Un-Candy

Who says an Easter basket has to be filled with candy? Growing up, my favorite non-candy treats OUR Easter Bunny put in our baskets was Aveda Shampure. Such a luxury back then! I think I once found an artichoke in my Easter basket, which I also thought was the greatest.

[Ok, but Cadbury Mini-Eggs and peanut M&Ms are also compulsory...]


Anyhow... say you want to give an Easter gift to a little friend who doesn't eat much candy? How about these Springy reminiscent-of-Easter-eggs bean bags? Great for juggling (or pelting). Also, they can be heated for a few seconds in the microwave and serve a little hand-warmers! So cute & so easy!


I made these using 5x5 squares and filled them with flax seeds. I tried making them egg-shaped, but it didn't work so well. If you want to be really awesome, you could make 12 of them and present them in an egg carton.

I'm pleased as punch. I feel like juggling.

Tuesday, March 29, 2011

DIY Tinted Moisturizer

I've been looking for a tinted moisturizer to bring with me to Haiti. It's going to be HOT and the sun intense, and there will be no time/need/space for makeup with the long hours I'm expecting to work (and only one carry-on bag!). More importantly, this ain't no fashion show... but, well, maybe I'm a little vain.

On the hunt for this stuff, it's hard to A) find a good color match, B) find enough SPF coverage, and C) I haven't found any under $20. I only need it for a week, and I'm trying to simplify, so I don't need any more products hanging around. So, I made due with what I had, and it actually worked out swimmingly!

Take these two products & mix them together in a little makeup pot:


And what do you get? The perfect match, perfect protection, perfect amount, use-what-you-got tinted moisturizer.


I already know I like the moisturizer and the makeup - I use them every day, so why wouldn't I like this?

It looks a little "white", but trust me, when you rub it into your face (or on your fingers or hand for testing), the color really comes through. Keep testing as you go if you decide to DIY too.

I feel a little bit fancy and a little more prepared. Wee!!

Thursday, March 24, 2011

Also, I Made a Skirt

I made a skirt the other day. Just like this one and this one.

(bad lighting + iPhone photo = awesome)

I made it out of this fabric and it's the perfect cold-weather skirt (made just in time for Spring to arrive! Super.) The greatest part is that the fabric was heavy enough that I didn't have to line it. I completed it in about 2.5 hours. Yessss!

Wednesday, March 23, 2011

Passport Cover Revamp

I'm totally in travel mode right now. And my passport cover needed a revamp. But I was totally out of good/interesting maps to make a cover with, hmmmm.

But I thought of something - what about making the outer cover with fabric & iron-on vinyl? And the inside with paper & contact paper? And so my new passport cover was born!


Polka-dots, of course.

I actually made two. One with a generic inside, maybe to sell/give away?:


And one with a custom inside - for me! Cuba (shout out to my roots) and Haiti (shout-out to my next destination). Luckily they're right next to each other!:


The inside flaps are a bit different than the last ones. Per D's request, I have a different kind of flap on the right side so you can fit tickets or other travel documents that may need to stick out the top. Also, the whole thing is a little bit smaller than the last one so your passport isn't flapping around inside (possible exaggeration).


You can also tuck your open passport into both pockets to display your ID open.


And that's my project for the day. Feeling satisfied. Maybe one day I'll make a tutorial for this. But for now, I need a nap.

More Baggies

You sick of these yet? Well, I use mine every day and love them! But I promise to curb my display of them soon.


These were all made with scraps, so each bag is a little different in size. Most of them went home with my mom and sister, so I suppose I'll have to make more :)

Tuesday, March 22, 2011

Cutest Gift Card Packaging Ever!

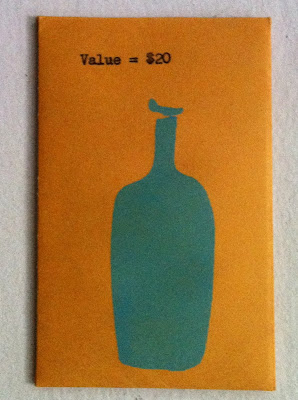
We have one last fund-raiser before we go to Haiti. Blue Bottle Coffee was kind enough to donate to our hospital-wide raffle. It's sure to be one of the most coveted raffle prizes!


And can we please talk about how cute this gift card packaging is?? I wish I had thought of it first! Can you imagine, someone literally put this teeny-tiny envelope into a typewriter. I can't even stand it!

High-kicks for the donation, for sure. And 100 high-kicks for the packaging!! Who needs coffee when the packaging can get me so excited? (oh, but their coffee is so gooooooooood!)

I will probably borrow this idea... just so you know.

Thursday, February 24, 2011

Stash-Busting Snack Bags


I've been home sick the past day and a half and one can only take so many 3-hour naps! I mustered some energy to go through my scraps and put together some reusable snack baggies.

While I prefer a more uniform process (hello, Virgo!), using scraps forced me to make them all different sizes. These range in size from 6.75x6.25 to 5x4.75. I have a whole stack of scraps lined up and destined to become snack baggies.

I must have gone through an orange phase, because I sure do have a lot of orange fabrics! I'll try to mix it up next go around.

p.s. Check out my friend's new blog: PeepThread ...she is so cool.

Wednesday, February 23, 2011

Tutorial: Reusable Snack Bags


You want some snack bags of your own? You can totally make them! Read all instructions before starting, and don't get too hung up on exact measurements/seam allowances. This is simple stuff - you'll do great!

Let's get started:

Start with a 6x12" rectangle of cotton fabric and a 6x12" rectangle of rip-stop nylon:


Cut a section of non-adhesive Velcro about 4 3/4" to 5" (I eyeballed this part):


Place your Velcro 1/2" from the top edge of the rip-stop nylon and center the Velcro to the middle of the fabric horizontally. Pin & sew in place around the edges of the Velcro:


Once your Velcro is sewn down, place the RIGHT SIDE of your cotton fabric to the VELCRO SIDE of your rip-stop fabric, pin, and sew only the top and bottom (short) edges using a 1/4" seam allowance:


Leaving your pieces RIGHT SIDES TOGETHER, fold the pieces in half so that the Velcro pieces stick together and you have a cotton half and a rip-stop half. Sew along the long edges leaving a 3" opening on one side (rip-stop end) so you can flip your baggie right-side out:


Turn your baggie right-side out & sew up your opening. You can clip the corners on your cotton fabric before turning for sharper corners:


Flip the rip-stop portion towards the inside of your cotton fabric. It will look like this:


Press & top-stitch your baggie. I did 2 rows of top-stitching using my Velcro as a guide.


And voila! You have made yourself a washable, reusable snack baggie!


I made 2 sizes here - the smaller one is the 6x12" instructions provided here (final: 5 1/2 x 5 1/2"). The larger is sandwich-sized using 7x14" as your starting measurements (final: 6 1/2 x 6 1/2") . I used an actual sandwich bag for the measurements:


You can hand- or machine-wash your baggies. Use them for any of your dry and non-drippy snacks. They're not water-tight, but sliced apples will be fine. These are a great stash-buster too!

Happy sewing & planet-saving!

Tuesday, February 22, 2011

All Your Cookie Are Belong To Me

D is a big cookie guy - lucky for him, I like to bake! We got this cook book for our wedding, and it is awesome! I made the Chocolate Oatmeal Walnut cookies after dinner last night. They were HUGE!!

See?


Woops, See?


I did NOT need too many of these lying around the house, so I pre-portioned some scoops and froze them for another moment of desperation.


My favorite part was that we were almost out of chocolate chips (we had 1 of the 12 ounces required for the recipe) and so D and I were scouring the kitchen for chocolate bars. We were able to scrap together 9 more ounces of chocolate. Yay! It was plenty. And the cookies were chewy and amazing! I think the secret is the molasses, personally. But I do love me some molasses.

Here's the recipe, if you dare.

Thanks to Sandy & Vince for the book - we love it!

Monday, February 21, 2011

Reusable Snack Bags

I read this [kinda life-changing] article in Sunset magazine last month. And while I perceive myself as fairly environmentally conscientious, in comparison to this family, I could only aspire to move in that direction (rather than fully adopt such a lifestyle at this time).

I mostly just wanted you to read that article and see how awesomely they live. But it really got me thinking about hyper-packaging (and packaging at all). I knew there was a justification for all my mason jar hoarding!

Anyhow, this inspiration brings us to the crafty section of this post: the revisitation of the reusable snack bag. I did end up sending them to my friend and she & her family loved them! She even ordered more and in different sizes! So exciting.

These are the ones I made for her - the request was that the fabric be not too girly, so her husband could use them too (!)... this information made. my. day. I opted for the super-awesome Echino fabrics that I bought at Purl while I was in NYC:

(hipstamatic shot = color distortion, but in a hip kind of way)

And these are the ones I made for myself. Probably also a fabric that's too expensive and fancy to get food all over, but I saw it at Birch Fabrics and had to have it. Plus, they're washable.


One is sandwich-sized (7x7) and the other is snackier-sized (6x6). I can't even wait to use them!

And if you're good, I might even post a tutorial on how to make your own! (It's rocket science, I tell ya). So get your sewing machines out!

Thursday, February 17, 2011

Please Tell Me You Know About Kale Chips...


I'm probably the last to know about (or try) kale chips, but I have to evangelize here a second. They are amazingly light and crispy and so un-kaley! Even my nephew who shuns all things green was begging for these little guys.

Here's how you make them:
  • Wash and dry your kale (I've used the darker, flatter Tuscan kale as well as rufflier traditional kale, both are great - use whatever's available)
  • Cut out the center rib of your kale and chop into pieces (3 to 5 per leaf)
  • Toss with a little olive oil and salt (use salt sparingly, these guys shrink up!)
  • Lay pieces in a single layer on a parchment-covered baking sheet (crowding them too much will cause them to steam instead)
  • Roast at 350F for 15-20 minutes or until crispy & still green (don't let them get brown! Brown = bitter)
  • Enjoy!
  • Check your teeth for kale bits before leaving the house
And get used to the phrase, "I want more kale!" because it's gonna happen.

Monday, February 07, 2011

Crafting for Haiti

Well, I'm headed for Haiti this April with a group of doctors and nurses from work. I still can't believe it! I'm feeling a mixture of excitement and hesitation, but I have wanted to do something like this for a long time.

Anyhow, since we must pay our own way to Haiti, what do we nurses do to raise money? We bake! I throw a little crafting in there as well :)

I made a double-batch of my all-time favorite, fool-proof granola recipe and packaged it up! I used those cute little Paper Source labels and my favorite font.


I had some lip balm ingredients left over from some Christmas gifts I made. So I just melted them down, added a bit more peppermint oil, and put it in jars. This lip balm recipe ROCKS, by the way.


And that's really all that's in this lip balm - see? It rocks!

Here's hoping for a successful bake sale (and mission!)!

*If you wish to make a monetary contribution to our mission, drop me a line and I'll let you know how.

Tuesday, January 18, 2011

Wishing it was Summer

Here's the Purl Soho storefront from our visit to NYC last summer. I can't wait for strawberry weather to return...


And I will probably have to visit Purl Soho again this trip... I have to, it's a crafter's obligation.

Sunday, January 16, 2011

Little Man Shirts

I totally forgot to post about this one... D's godson, Charlie, turned two (way back in August). He's totally like 2 1/4 by now, such a big boy!

I'm so excited because we leave this Friday for NYC and we'll get to see him!


(like I said, I'm out of this woodgrain fabric and still so sad about it... keep your eyes peeled, people!
But glad I was able to make a super-manly "2" shirt with it before I ran out!)


This is Charlie's 2nd necktie shirt, but when you're a city guy, you've gotta step up the class, you know what I'm sayin'?


I just can't get enough of these necktie shirts... good thing there are lots of little boys around to wear them!

Tuesday, January 04, 2011

Makeup Brush Roll

I didn't make too many Christmas gifts this year, which was surprisingly liberating. I do love making gifts, but I just end up putting so much pressure on myself to make "the perfect thing".

In any case, here's one pressure-free gift that I did make. I used a modification of this tutorial.


I used a couple of coordinating Joel Dewberry fabrics (I'm obsessed with the herringbone fabric).

And what is super-awesome about using this fabric for a brush roll is that I was able to hide the seams for the brush pockets. They vary in size, which is perfect for brushes that vary in size. High kicks for that!


See? You can't even see the seams!!

This project will take you all of 30 minutes (at most), and if you're not a makeup brush person, you can use it for knitting needles, colored pencils, or even your chopstick collection! :)

Sunday, January 02, 2011

Mug Rug

I'm late on the whole "mug rug" bandwagon, which was so 2009... but whatever.


I made this one in just a few minutes (well, the top anyhow) with some scraps from my scrap bin and I used my favorite old-school bias tape for the binding. I literally just plopped the scraps on white backing and stitched them on one-by-one, freehand. This was an exercise in whimsy.

[sidenote: I'm so sad that I'm officially out of that woodgrain fabric!! I can't find it anywhere! If you spot it, buy me a yard or two and I'll totally pay you back. Must be a supply-demand thing that makes me want it so badly!]

p.s. a "mug rug" is like a cross between a coaster and a place mat - with just enough space for your coffee cup and a pastry :)

Wednesday, December 15, 2010

Lip Balm Factory


I have been busy this afternoon making peppermint lip balms! In truth, it really only took about an hour. I got the recipe here and I am in LOVE with it! It might even rival my favorite lip balm of all time (from this company). I used peppermint oil, but perhaps next time I'll try lemon - I think that will be delicious and amazing. If you're feeling economical (and maybe a little bit lazy) I have been dying to try the lip balm kits found here. If you do, let me know how they turn out.

And why so many lip balms, you ask? I'm in charge of making holiday baskets for the doctors at work again. So there will be no MDs in our unit with chapped lips... :) There was even a little left over for D and I to have our own little pots too!

So, if you're looking for a largeish-quantity, fairly economical, home-made but not-from-the-oven (read: fattening), quick holiday gift (or if Santa is looking for stocking-stuffer ideas), this is for you!

Project Facts (ish):

* I don't know how much volume the pots hold, but it's a generous "serving." I bought them, and all the other ingredients, at Rainbow Grocery (aka Heaven on Earth) for $.79 each (you can totally find them cheaper online, but I was pressed for time).

* The labels are wedding leftovers from Paper Source. The 1.5" labels fit perfectly!

* I melted all ingredients together in a tin can over a pot of simmering water (to keep our pots nice and mess-free).

* I one-and-a-halved the recipe and made 17 pots (with some leftover, maybe could make about 3 more?).

* Supplies and ingredients came to around $23 (and like I said, you could do this much cheaper).

Enjoy!